
API for developers and resellers


XServer Cloud now has a public API. It lets you do everything you can do in the dashboard: order and renew servers, manage them and pay invoices. Only now your code does it instead of you clicking through it. Build server ordering into your own panel, automate routine work, or run your own business on top of our servers.
Who it's for
Resellers and web agencies. Sell XServer Cloud servers to your customers under your own brand and at your own prices. Your website or billing system orders a server through the API, the payment is taken from your balance, and the customer gets a ready-to-use machine. The more servers you have, the lower your purchase price: 5 active servers get you a 5% discount, 10 get 10%, 15 get 15%. If you already have a personal discount, it applies regardless of how many servers you have. Discounts don't stack: when the volume discount is larger than your personal one, the volume discount applies.
DevOps engineers. Reboots, OS reinstalls, snapshots before an upgrade, backups, SSH keys, additional IP addresses — all of this can now be called from scripts, CI/CD pipelines and orchestration systems.
Anyone keeping the books. Pull your server list, payment due dates, balance and invoices into your own monitoring or accounting system.
What the API can do
- Servers: list and status, power on, power off and reboot, console, OS reinstall, IP addresses, snapshots and backups.
- Ordering: a price quote and an order for a virtual or physical server, with add-on services and a promo code.
- Renewal: quote and renew from your balance.
- Payment: pay an invoice from your balance.
- Reference data: locations, plans, OS templates, add-on services.
- Finance: balance, invoices, transaction history.
Getting started
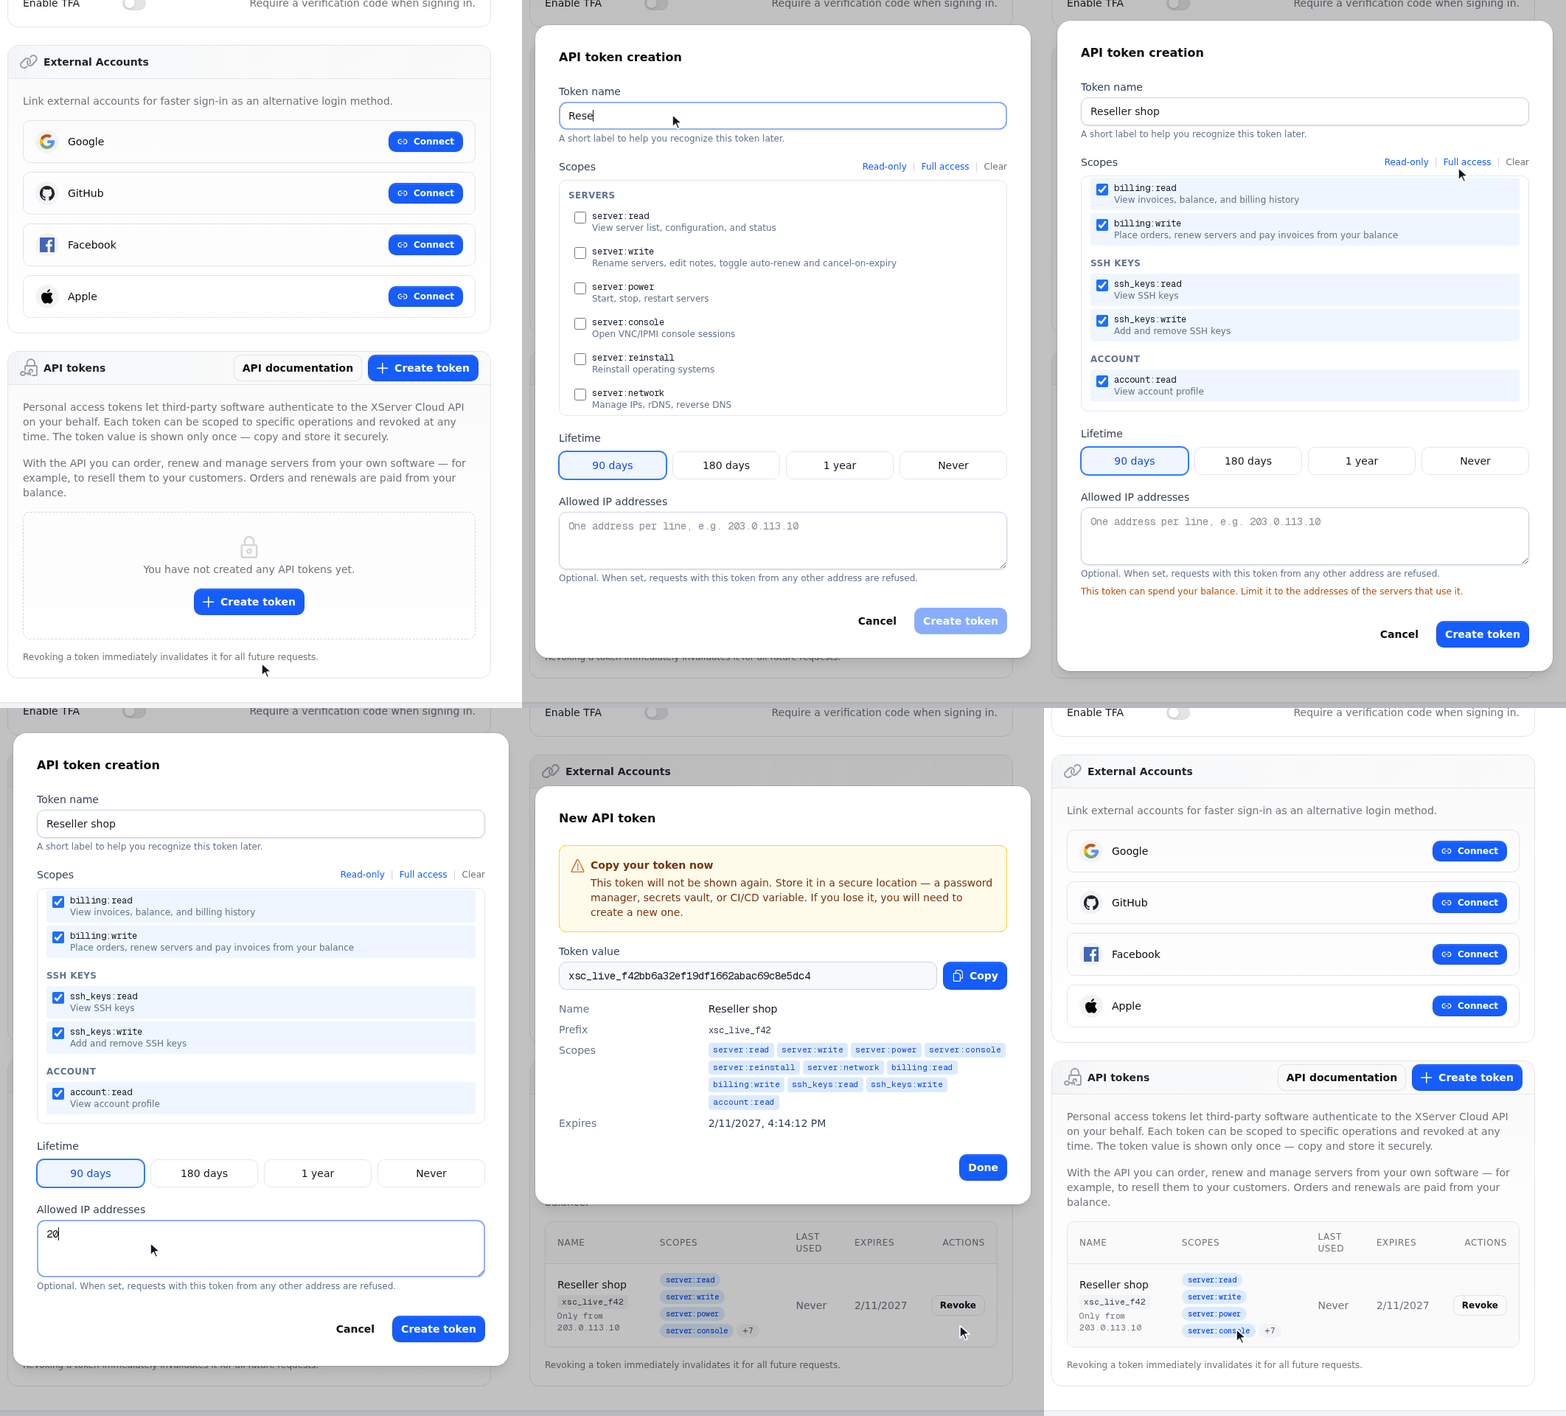
- Open Settings → Authentication and click Create token in the “API tokens” section.
- Give the token a name and choose its permissions. Read access is enough for monitoring. To order and renew servers, the token needs the
billing:writepermission — “Order and renew servers, pay invoices from balance”. - Copy the token: it is shown only once.
- Open the API documentation (the button is right there) — every method can be tried directly in your browser.
Security
The API works with your money and your servers, so we made protection strict by default:
- Only the permissions you need. A token gets only the permissions you select. A member of your team cannot give a token more than they are allowed themselves.
- IP binding. A token can be restricted to your servers' addresses — requests from any other address will be rejected. For a token that can spend your balance, we strongly recommend doing this.
- One-click revocation. The token list shows when each token was last used. An unneeded or suspicious token is revoked instantly.
- A limit on money operations. A single token can make up to 20 orders, renewals and payments per hour — this protects your balance if the token falls into the wrong hands. If your business needs more, contact support and we will raise the limit for your account.
- Money from the balance only. The API cannot charge your card. If your balance is short, the order isn't lost: you get an invoice that you can pay later.
Example: ordering a server in two requests
First, get the exact price. The quote takes your discount and promo code into account — and matches the actual charge to the cent:
curl -X POST https://app.xserver.cloud/api/v1/orders/preview \
  -H "Authorization: Bearer $XSC_TOKEN" \
  -H "Content-Type: application/json" \
  -d '{"cpu": 2, "ram": 4, "ssd": 40, "location_code": "DE",
       "os_template_code": "ubuntu2404", "period_months": 1}'
Happy with the price? Place the order with the same request body:
curl -X POST https://app.xserver.cloud/api/v1/orders \
  -H "Authorization: Bearer $XSC_TOKEN" \
  -H "Content-Type: application/json" \
  -d '{"cpu": 2, "ram": 4, "ssd": 40, "location_code": "DE",
       "os_template_code": "ubuntu2404", "period_months": 1}'
The response contains the order and the paid invoice. The server appears in your list as soon as it is ready.
Documentation
A full description of every method with examples is in the API documentation. You can also send requests right from your browser there. The OpenAPI description (openapi.json) lets you generate a client library for your programming language.
Give it a try
Create your first token in Settings → Authentication. Missing a method, or have an idea for making the API more convenient? Contact our support — we are building the API together with the people who use it.